- Javascript
- Python
Prerequisites
Before using this example, make sure you:
- Install Node.js 18+ and
npm. - Set up an OpenAI API key.
- Complete the User authentication quickstart to create a Next.js app integrated with Auth0.
- Set up and configure a Google Cloud project:
- Enable the Google Calendar API.
- Create OAuth 2.0 credentials (Web Application) with proper redirect URIs.
- Configure a Social Connection for Google in Auth0
- Make sure to enable
Token Vault - Select
Offline Accessscope
- Make sure to enable
 AI SDK
 Cloudflare Agents
 LangGraph
 GenKit
 LlamaIndex
 NextJS-Auth0
1. Configure Auth0 AI
First, you must install the SDK:Report incorrect code
Copy
Ask AI
npm install @auth0/ai-vercel
./src/lib/auth0-ai.ts
Report incorrect code
Copy
Ask AI
import { Auth0AI } from "@auth0/ai-vercel";
import { auth0 } from "@/lib/auth0";

const auth0AI = new Auth0AI();

export const withGoogleCalendar = auth0AI.withTokenForConnection({
  connection: "google-oauth2",
  scopes: ["https://www.googleapis.com/auth/calendar.freebusy"],
  refreshToken: async () => {
    const session = await auth0.getSession();
    const refreshToken = session?.tokenSet.refreshToken as string;

    return refreshToken;
  },
});
Here, the property
You can check different authentication options for Next.js with Auth0 at the official documentation.
auth0 is an instance of @auth0/nextjs-auth0 to handle the application auth flows. You can check different authentication options for Next.js with Auth0 at the official documentation.
2. Integrate your tool with Google Calendar
Wrap your tool using the Auth0 AI SDK to obtain an access token for the Google Calendar API../src/lib/tools/checkUsersCalendar.ts
Report incorrect code
Copy
Ask AI
import { addHours, formatISO } from "date-fns";
import { GaxiosError } from "gaxios";
import { google } from "googleapis";
import { getAccessTokenForConnection } from "@auth0/ai-vercel";
import { FederatedConnectionError } from "@auth0/ai/interrupts";
import { withGoogleCalendar } from "@/lib/auth0-ai";
import { tool } from "ai";
import { z } from "zod";

export const checkUsersCalendar = withGoogleCalendar(
  tool({
    description:
      "Check user availability on a given date time on their calendar",
    parameters: z.object({
      date: z.coerce.date(),
    }),
    execute: async ({ date }) => {
      // Get the access token from Auth0 AI
      const accessToken = getAccessTokenForConnection();

      // Google SDK
      try {
        const calendar = google.calendar("v3");
        const auth = new google.auth.OAuth2();

        auth.setCredentials({
          access_token: accessToken,
        });

        const response = await calendar.freebusy.query({
          auth,
          requestBody: {
            timeMin: formatISO(date),
            timeMax: addHours(date, 1).toISOString(),
            timeZone: "UTC",
            items: [{ id: "primary" }],
          },
        });

        return {
          available: response.data?.calendars?.primary?.busy?.length === 0,
        };
      } catch (error) {
        if (error instanceof GaxiosError) {
          if (error.status === 401) {
            throw new FederatedConnectionError(
              `Authorization required to access the Federated Connection`
            );
          }
        }

        throw error;
      }
    },
  })
);
3. Handle authentication redirects
Interrupts are a way for the system to pause execution and prompt the user to take an action—such as authenticating or granting API access—before resuming the interaction. This ensures that any required access is granted dynamically and securely during the chat experience. In this context, Auth0-AI SDK manages authentication redirects in the Vercel AI SDK via these interrupts.Server Side
On the server-side code of your Next.js App, you need to set up the tool invocation and handle the interruption messaging via theerrorSerializer. The setAIContext function is used to set the async-context for the Auth0 AI SDK../src/app/api/chat/route.ts
Report incorrect code
Copy
Ask AI
import { createDataStreamResponse, Message, streamText } from "ai";
import { checkUsersCalendar } from "@/lib/tools/";
import { setAIContext } from "@auth0/ai-vercel";
import { errorSerializer, withInterruptions } from "@auth0/ai-vercel/interrupts";
import { openai } from "@ai-sdk/openai";

export async function POST(request: Request) {
  const { id, messages} = await request.json();
  const tools = { checkUsersCalendar };
  setAIContext({ threadID: id });

  return createDataStreamResponse({
    execute: withInterruptions(
      async (dataStream) => {
        const result = streamText({
          model: openai("gpt-4o-mini"),
          system: "You are a friendly assistant! Keep your responses concise and helpful.",
          messages,
          maxSteps: 5,
          tools,
        });

        result.mergeIntoDataStream(dataStream, {
          sendReasoning: true,
        });
      },
      { messages, tools }
    ),
    onError: errorSerializer((err) => {
      console.log(err);
      return "Oops, an error occured!";
    }),
  });
}
Client Side
On this example we utilize theEnsureAPIAccessPopup component to show a popup that allows the user to authenticate with Google Calendar and grant access with the requested scopes. You’ll first need to install the @auth0/ai-components package:Report incorrect code
Copy
Ask AI
npx @auth0/ai-components add FederatedConnections
./src/components/chat.tsx
Report incorrect code
Copy
Ask AI
"use client";

import { useChat } from "@ai-sdk/react";
import { useInterruptions } from "@auth0/ai-vercel/react";
import { FederatedConnectionInterrupt } from "@auth0/ai/interrupts";
import { EnsureAPIAccessPopup } from "@/components/auth0-ai/FederatedConnections/popup";

export default function Chat() {
  const { messages, handleSubmit, input, setInput, toolInterrupt } =
    useInterruptions((handler) =>
      useChat({
        onError: handler((error) => console.error("Chat error:", error)),
      })
    );

  return (
    <div>
      {messages.map((message) => (
        <div key={message.id}>
          {message.role === "user" ? "User: " : "AI: "}
          {message.content}
        </div>
      ))}

      {FederatedConnectionInterrupt.isInterrupt(toolInterrupt) && (
        <EnsureAPIAccessPopup
          interrupt={toolInterrupt}
          connectWidget={{
            title: "Check your availability in Google Calendar",
            description:"description ...",
            action: { label: "Check" },
          }}
        />
      )}

      <form onSubmit={handleSubmit}>
        <input value={input} placeholder="Say something..." onChange={(e) => setInput(e.target.value)} />
      </form>
    </div>
  );
}
1. Configure Auth0 AI
If you started from the Auth0 Cloudflare Agents starter kit, you can skip this step as the Auth0 AI SDK is already configured.
- Auth0 Hono Web SDK: for the Worker.
- Auth0 Cloudflare Agents API SDK for the Chat Agent.
Report incorrect code
Copy
Ask AI
npm install @auth0/ai-vercel @auth0/ai-cloudflare @auth0/ai
./src/lib/auth0-ai.ts
Report incorrect code
Copy
Ask AI
import { Auth0AI, setGlobalAIContext } from "@auth0/ai-vercel";
import { getCurrentAgent } from "agents";
import type { Chat } from "./chat";

const getAgent = () => {
  const { agent } = getCurrentAgent<Chat>();
  if (!agent) {
    throw new Error("No agent found");
  }
  return agent;
};

setGlobalAIContext(() => ({ threadID: getAgent().name }));

const auth0AI = new Auth0AI();

export const withGoogleCalendar = auth0AI.withTokenForConnection({
  connection: "google-oauth2",
  scopes: ["https://www.googleapis.com/auth/calendar.freebusy"],
  refreshToken: async () => {
    const credentials = getAgent().getCredentials();
    return credentials?.refresh_token;
  },
});
2. Integrate your tool with Google Calendar
Wrap your tool using the Auth0 AI SDK to obtain an access token for the Google Calendar API../src/agent/tools/checkUsersCalendar.ts
Report incorrect code
Copy
Ask AI
import { addHours, formatISO } from "date-fns";
import { GaxiosError } from "gaxios";
import { google } from "googleapis";
import { getAccessTokenForConnection } from "@auth0/ai-vercel";
import { FederatedConnectionError } from "@auth0/ai/interrupts";
import { withGoogleCalendar } from "@/lib/auth0-ai";
import { tool } from "ai";
import { z } from "zod";

export const checkUsersCalendar = withGoogleCalendar(
  tool({
    description:
      "Check user availability on a given date time on their calendar",
    parameters: z.object({
      date: z.coerce.date(),
    }),
    execute: async ({ date }) => {
      // Get the access token from Auth0 AI
      const accessToken = getAccessTokenForConnection();

      // Google SDK
      try {
        const calendar = google.calendar("v3");
        const auth = new google.auth.OAuth2();

        auth.setCredentials({
          access_token: accessToken,
        });

        const response = await calendar.freebusy.query({
          auth,
          requestBody: {
            timeMin: formatISO(date),
            timeMax: addHours(date, 1).toISOString(),
            timeZone: "UTC",
            items: [{ id: "primary" }],
          },
        });

        return {
          available: response.data?.calendars?.primary?.busy?.length === 0,
        };
      } catch (error) {
        if (error instanceof GaxiosError) {
          if (error.status === 401) {
            throw new FederatedConnectionError(
              `Authorization required to access the Federated Connection`
            );
          }
        }

        throw error;
      }
    },
  })
);
3. Handle authentication redirects
Interrupts are a way for the system to pause execution and prompt the user to take an action—such as authenticating or granting API access—before resuming the interaction. This ensures that any required access is granted dynamically and securely during the chat experience. In this context, Auth0-AI SDK manages authentication redirects in the Vercel AI SDK via these interrupts.If you started from the Auth0 Cloudflare Agents starter kit, you can skip this section as the Auth0 AI SDK is already configured to handle interrupts.
Server Side
On the Chat agent class, you need to set up the tool invocation and handle the interruption messaging via theerrorSerializer../src/agent/chat.ts
Report incorrect code
Copy
Ask AI
import { setAIContext } from "@auth0/ai-vercel";
import { errorSerializer, withInterruptions } from "@auth0/ai-vercel/interrupts";
// Other dependencies
import { AuthAgent, OwnedAgent } from "@auth0/auth0-cloudflare-agents-api";
import { openai } from "@ai-sdk/openai";
import { AIChatAgent } from "agents/ai-chat-agent";

const SuperAgent = OwnedAgent(AuthAgent(AIChatAgent<Env>));

export class Chat extends SuperAgent {
 async onChatMessage(
    onFinish: StreamTextOnFinishCallback<ToolSet>,
    options?: { abortSignal?: AbortSignal }
  ) {
    // Collect all tools, including MCP tools
    const allTools = {
      ...tools,
      ...this.mcp.unstable_getAITools(),
    };
    const claims = this.getClaims();
    // Create a streaming response that handles both text and tool outputs
    const dataStreamResponse = createDataStreamResponse({
      execute: withInterruptions(async (dataStream) => {
        // Process any pending tool calls from previous messages
        // This handles human-in-the-loop confirmations for tools
        const processedMessages = await processToolCalls({
          messages: this.messages,
          dataStream,
          tools: allTools,
          executions,
        });

        // Stream the AI response using GPT-4
        const result = streamText({
          model,
          system: `You are a helpful assistant that can do various tasks...

${unstable_getSchedulePrompt({ date: new Date() })}

If the user asks to schedule a task, use the schedule tool to schedule the task.

The name of the user is ${claims?.name ?? "unknown"}.
`,
          messages: processedMessages,
          tools: allTools,
          onFinish: async (args) => {
            onFinish(
              args as Parameters<StreamTextOnFinishCallback<ToolSet>>[0]
            );
          },
          onError: (error) => {
            if (!Auth0Interrupt.isInterrupt(error)) {
              return;
            }
            console.error("Error while streaming:", error);
          },
          maxSteps: 10,
        });

        // Merge the AI response stream with tool execution outputs
        result.mergeIntoDataStream(dataStream);
      }),
      onError: errorSerializer((err) => {
        console.log(err);
        return "Oops, an error occured!";
      }),
    });

    return dataStreamResponse;
  }
}
Client Side
On this example we utilize theEnsureAPIAccessPopup component to show a popup that allows the user to authenticate with Google Calendar and grant access with the requested scopes. You’ll first need to install the @auth0/ai-components package:Report incorrect code
Copy
Ask AI
npx @auth0/ai-components add FederatedConnections
./src/components/chat.tsx
Report incorrect code
Copy
Ask AI
"use client";

import { useChat } from "@ai-sdk/react";
import { useAgentChatInterruptions } from "@auth0/ai-cloudflare/react";
import { FederatedConnectionInterrupt } from "@auth0/ai/interrupts";
import { EnsureAPIAccessPopup } from "@/components/auth0-ai/FederatedConnections/popup";

export default function Chat() {

  const {
    messages: agentMessages,
    input: agentInput,
    handleInputChange: handleAgentInputChange,
    handleSubmit: handleAgentSubmit,
    addToolResult,
    clearHistory,
    toolInterrupt,
  } = useAgentChatInterruptions({
    agent,
    maxSteps: 5,
    id: threadID,
  });

  return (
    <div>
      {messages.map((message) => (
        <div key={message.id}>
          {message.role === "user" ? "User: " : "AI: "}
          {message.content}
        </div>
      ))}

      {FederatedConnectionInterrupt.isInterrupt(toolInterrupt) && (
        <EnsureAPIAccessPopup
          interrupt={toolInterrupt}
          connectWidget={{
            title: "Check your availability in Google Calendar",
            description:"description ...",
            action: { label: "Check" },
          }}
        />
      )}

      <form onSubmit={handleSubmit}>
        <input value={input} placeholder="Say something..." onChange={(e) => setInput(e.target.value)} />
      </form>
    </div>
  );
}
1. Configure Auth0 AI
First, you must install the SDK:Report incorrect code
Copy
Ask AI
npm install @auth0/ai-langchain
./src/lib/auth0-ai.ts
Report incorrect code
Copy
Ask AI
import { Auth0AI } from "@auth0/ai-langchain";

const auth0AI = new Auth0AI();

export const withGoogleCalendar = auth0AI.withTokenForConnection({
  connection: "google-oauth2",
  scopes: ["https://www.googleapis.com/auth/calendar.freebusy"],
  // Optional: By default, the SDK will expect the refresh token from
  // the LangChain RunnableConfig (`config.configurable._credentials.refreshToken`)
  // If you want to use a different store for refresh token you can set up a getter here
  // refreshToken: async () => await getRefreshToken(),
});
2. Integrate your tool with Google Calendar
Wrap your tool using the Auth0 AI SDK to obtain an access token for the Google Calendar API../src/lib/tools/checkUsersCalendar.ts
Report incorrect code
Copy
Ask AI
import { addHours, formatISO } from "date-fns";
import { GaxiosError } from "gaxios";
import { google } from "googleapis";
import { getAccessTokenForConnection } from "@auth0/ai-langchain";
import { FederatedConnectionError } from "@auth0/ai/interrupts";
import { withGoogleCalendar } from "@/lib/auth0-ai";
import { tool } from "@langchain/core/tools";
import { z } from "zod";

export const checkUsersCalendar = withGoogleCalendar(
  tool(async ({ date }) => {
    // Get the access token from Auth0 AI
    const accessToken = getAccessTokenForConnection();

    // Google SDK
    try {
      const calendar = google.calendar("v3");
      const auth = new google.auth.OAuth2();

      auth.setCredentials({
        access_token: accessToken,
      });

      const response = await calendar.freebusy.query({
        auth,
        requestBody: {
          timeMin: formatISO(date),
          timeMax: addHours(date, 1).toISOString(),
          timeZone: "UTC",
          items: [{ id: "primary" }],
        },
      });

      return {
        available: response.data?.calendars?.primary?.busy?.length === 0,
      };
    } catch (err) {
      if (err instanceof GaxiosError && err.status === 401) {
        throw new FederatedConnectionError(
          `Authorization required to access the Federated Connection`
        );
      }
      throw err;
    }
  },
  {
    name: "check_user_calendar",
    description:
      "Use this function to check if the user is available on a certain date and time",
    schema: z.object({
      date: z.coerce.date(),
    }),
  })
);
ToolNode. The agent will automatically request the access token when the tool is called../src/lib/agent.ts
Report incorrect code
Copy
Ask AI
import { AIMessage } from "@langchain/core/messages";
import { RunnableLike } from "@langchain/core/runnables";
import { END, InMemoryStore, MemorySaver, MessagesAnnotation, START, StateGraph } from "@langchain/langgraph";
import { ToolNode } from "@langchain/langgraph/prebuilt";
import { ChatOpenAI } from "@langchain/openai";

import { checkUsersCalendar } from "@/lib/tools/checkUsersCalendar";

const model = new ChatOpenAI({ model: "gpt-4o", }).bindTools([
  checkUsersCalendar,
]);

const callLLM = async (state: typeof MessagesAnnotation.State) => {
  const response = await model.invoke(state.messages);
  return { messages: [response] };
};

const routeAfterLLM: RunnableLike = function (state) {
  const lastMessage = state.messages[state.messages.length - 1] as AIMessage;
  if (!lastMessage.tool_calls?.length) {
    return END;
  }
  return "tools";
};

const stateGraph = new StateGraph(MessagesAnnotation)
  .addNode("callLLM", callLLM)
  .addNode(
    "tools",
    new ToolNode(
      [
        // A tool with federated connection access
        checkUsersCalendar,
        // ... other tools
      ],
      {
        // Error handler should be disabled in order to
        // trigger interruptions from within tools.
        handleToolErrors: false,
      }
    )
  )
  .addEdge(START, "callLLM")
  .addConditionalEdges("callLLM", routeAfterLLM, [END, "tools"])
  .addEdge("tools", "callLLM");

const checkpointer = new MemorySaver();
const store = new InMemoryStore();

export const graph = stateGraph.compile({
  checkpointer,
  store,
});
3. Handle authentication redirects
Interrupts are a way for the system to pause execution and prompt the user to take an action —such as authenticating or granting API access— before resuming the interaction. This ensures that any required access is granted dynamically and securely during the chat experience. In this context, Auth0-AI SDK manages such authentication redirects integrated with the Langchain SDK.Server Side
On the server side of your Next.js application you need to set up a route to handle the Chat API requests. This route will be responsible for forwarding the requests to the LangGraph API. Additionally, you must provide therefreshToken to the Langchain’s RunnableConfig from the authenticated user’s session../src/app/api/langgraph/[..._path]/route.ts
Report incorrect code
Copy
Ask AI
import { initApiPassthrough } from "langgraph-nextjs-api-passthrough";
import { auth0 } from "@/lib/auth0";

const getRefreshToken = async () => {
  const session = await auth0.getSession();
  const refreshToken = session?.tokenSet.refreshToken as string;
  return refreshToken;
};

export const { GET, POST, PUT, PATCH, DELETE, OPTIONS, runtime } =
  initApiPassthrough({
    apiUrl: process.env.LANGGRAPH_API_URL,
    apiKey: process.env.LANGSMITH_API_KEY,
    runtime: "edge",
    baseRoute: "langgraph/",
    bodyParameters: async (req, body) => {
      if (
        req.nextUrl.pathname.endsWith("/runs/stream") &&
        req.method === "POST"
      ) {
        return {
          ...body,
          config: {
            configurable: {
              _credentials: {
                refreshToken: await getRefreshToken(),
              },
            },
          },
        };
      }

      return body;
    },
  });
auth0 is an instance of @auth0/nextjs-auth0 to handle the application auth flows. You can check different authentication options for Next.js with Auth0 at the official documentation. :::
Client Side
On this example we utilize theEnsureAPIAccessPopup component to show a popup that allows the user to authenticate with Google Calendar and grant access with the requested scopes. You’ll first need to install the @auth0/ai-components package:Report incorrect code
Copy
Ask AI
npx @auth0/ai-components add FederatedConnections
./src/components/chat.tsx
Report incorrect code
Copy
Ask AI
import { useStream } from "@langchain/langgraph-sdk/react";
import { FederatedConnectionInterrupt } from "@auth0/ai/interrupts";
import { EnsureAPIAccessPopup } from "@/components/auth0-ai/FederatedConnections/popup";

const useFocus = () => {
  const htmlElRef = useRef<HTMLInputElement>(null);
  const setFocus = () => {
    if (!htmlElRef.current) {
      return;
    }
    htmlElRef.current.focus();
  };
  return [htmlElRef, setFocus] as const;
};

export default function Chat() {
  const [threadId, setThreadId] = useQueryState("threadId");
  const [input, setInput] = useState("");
  const thread = useStream({
    apiUrl: `${process.env.NEXT_PUBLIC_URL}/api/langgraph`,
    assistantId: "agent",
    threadId,
    onThreadId: setThreadId,
    onError: (err) => {
      console.dir(err);
    },
  });

  const [inputRef, setInputFocus] = useFocus();
  useEffect(() => {
    if (thread.isLoading) {
      return;
    }
    setInputFocus();
  }, [thread.isLoading, setInputFocus]);

  const handleSubmit: FormEventHandler<HTMLFormElement> = async (e) => {
    e.preventDefault();
    thread.submit(
      { messages: [{ type: "human", content: input }] },
      {
        optimisticValues: (prev) => ({
          messages: [
            ...((prev?.messages as []) ?? []),
            { type: "human", content: input, id: "temp" },
          ],
        }),
      }
    );
    setInput("");
  };

  return (
    <div>
      {thread.messages.filter((m) => m.content && ["human", "ai"].includes(m.type)).map((message) => (
        <div key={message.id}>
          {message.type === "human" ? "User: " : "AI: "}
          {message.content as string}
        </div>
      ))}

      {thread.interrupt && FederatedConnectionInterrupt.isInterrupt(thread.interrupt.value) ? (
        <div key={thread.interrupt.ns?.join("")}>
          <EnsureAPIAccessPopup
            interrupt={thread.interrupt.value}
            onFinish={() => thread.submit(null)}
            connectWidget={{
                title: "Check your availability in Google Calendar",
                description:"description ...",
                action: { label: "Check" },
              }}
          />
        </div>
      ) : null}

      <form onSubmit={handleSubmit}>
        <input ref={inputRef} value={input} placeholder="Say something..." readOnly={thread.isLoading} disabled={thread.isLoading} onChange={(e) => setInput(e.target.value)} />
      </form>
    </div>
  );
}
1. Configure Auth0 AI
First, you must install the SDK:Report incorrect code
Copy
Ask AI
npm install @auth0/ai-genkit
./src/lib/auth0-ai.ts
Report incorrect code
Copy
Ask AI
import { Auth0AI } from "@auth0/ai-genkit";
import { auth0 } from "@/lib/auth0";

// importing GenKit instance
import { ai } from "./genkit";

const auth0AI = new Auth0AI({
  genkit: ai,
});

export const withGoogleCalendar = auth0AI.withTokenForConnection({
  connection: "google-oauth2",
  scopes: ["https://www.googleapis.com/auth/calendar.freebusy"],
  refreshToken: async () => {
    const session = await auth0.getSession();
    const refreshToken = session?.tokenSet.refreshToken as string;
    return refreshToken;
  },
});
Here, the property
You can check different authentication options for Next.js with Auth0 at the official documentation.
auth0 is an instance of @auth0/nextjs-auth0 to handle the application auth flows. You can check different authentication options for Next.js with Auth0 at the official documentation.
2. Integrate your tool with Google Calendar
Wrap your tool using the Auth0 AI SDK to obtain an access token for the Google Calendar API../src/lib/tools/checkUsersCalendar.ts
Report incorrect code
Copy
Ask AI
import { addHours } from "date-fns";
import { z } from "zod";
import { getAccessTokenForConnection } from "@auth0/ai-genkit";
import { FederatedConnectionError } from "@auth0/ai/interrupts";
import { withGoogleCalendar } from "@/lib/auth0-ai";

// importing GenKit instance
import { ai } from "../genkit";

export const checkUsersCalendar = ai.defineTool(
  ...withGoogleCalendar(
    {
      description:
        "Check user availability on a given date time on their calendar",
      inputSchema: z.object({
        date: z.coerce
          .date()
          .describe("Date to check availability for in UTC time always."),
      }),
      name: "checkUsersCalendar",
    },
    async ({ date }) => {
      // Get the access token from Auth0 AI
      const accessToken = getAccessTokenForConnection();

      // Google SDK
      try {
        const calendar = google.calendar("v3");
        const auth = new google.auth.OAuth2();

        auth.setCredentials({
          access_token: .accessToken,
        });

        const response = await calendar.freebusy.query({
          auth,
          requestBody: {
            timeMin: formatISO(date),
            timeMax: addHours(date, 1).toISOString(),
            timeZone: "UTC",
            items: [{ id: "primary" }],
          },
        });

        return {
          available: response.data?.calendars?.primary?.busy?.length === 0,
        };
      } catch (error) {
        if (error instanceof GaxiosError) {
          if (error.status === 401) {
            throw new FederatedConnectionError(
              `Authorization required to access the Federated Connection`
            );
          }
        }

        throw error;
      }
    }
  )
);
3. Handle authentication redirects
Interrupts are a way for the system to pause execution and prompt the user to take an action—such as authenticating or granting API access—before resuming the interaction. This ensures that any required access is granted dynamically and securely during the chat experience. In this context, Auth0-AI SDK manages authentication redirects in the GenKit SDK via these interrupts.Server Side
On the server-side code of your Next.js App, you need to set up the tool invocation and handle the interruption messaging via theerrorSerializer. The setAIContext function is used to set the async-context for the Auth0 AI SDK../src/app/api/chat/route.ts
Report incorrect code
Copy
Ask AI
import { ToolRequestPart } from "genkit";
import path from "path";
import { ai } from "@/lib/genkit";
import { checkUsersCalendar } from "@/lib/tools/check-user-calendar";
import { resumeAuth0Interrupts } from "@auth0/ai-genkit";
import { auth0 } from "@/lib/auth0";

export async function POST(
  request: Request,
  { params }: { params: Promise<{ id: string }> }
) {
  const auth0Session = await auth0.getSession();
  const { id } = await params;
  const {
    message,
    interruptedToolRequest,
    timezone,
  }: {
    message?: string;
    interruptedToolRequest?: ToolRequestPart;
    timezone: { region: string; offset: number };
  } = await request.json();

  let session = await ai.loadSession(id);

  if (!session) {
    session = ai.createSession({
      sessionId: id,
    });
  }

  const tools = [checkUsersCalendar];

  const chat = session.chat({
    tools: tools,
    system: `You are a helpful assistant.
    The user's timezone is ${timezone.region} with an offset of ${timezone.offset} minutes.
    User's details: ${JSON.stringify(auth0Session?.user, null, 2)}.
    You can use the tools provided to help the user.
    You can also ask the user for more information if needed.
    Chat started at ${new Date().toISOString()}
    `,
  });

  const r = await chat.send({
    prompt: message,
    resume: resumeAuth0Interrupts(tools, interruptedToolRequest),
  });

  return Response.json({ messages: r.messages, interrupts: r.interrupts });
}

export async function GET(
  request: Request,
  { params }: { params: Promise<{ id: string }> }
) {
  const { id } = await params;

  const session = await ai.loadSession(id);

  if (!session) {
    return new Response("Session not found", {
      status: 404,
    });
  }

  const json = session.toJSON();

  if (!json?.threads?.main) {
    return new Response("Session not found", {
      status: 404,
    });
  }

  return Response.json(json.threads.main);
}
Client Side
On this example we utilize theEnsureAPIAccessPopup component to show a popup that allows the user to authenticate with Google Calendar and grant access with the requested scopes. You’ll first need to install the @auth0/ai-components package:Report incorrect code
Copy
Ask AI
npx @auth0/ai-components add FederatedConnections
./src/components/chat.tsx
Report incorrect code
Copy
Ask AI
"use client";
import { useQueryState } from "nuqs";
import { FormEventHandler, useEffect, useRef, useState } from "react";
import { FederatedConnectionInterrupt } from "@auth0/ai/interrupts";
import { EnsureAPIAccessPopup } from "@/components/auth0-ai/FederatedConnections/popup";
import Markdown from "react-markdown";

const useFocus = () => {
  const htmlElRef = useRef<HTMLInputElement>(null);
  const setFocus = () => {
    if (!htmlElRef.current) {
      return;
    }
    htmlElRef.current.focus();
  };
  return [htmlElRef, setFocus] as const;
};

export default function Chat() {
  const [threadId, setThreadId] = useQueryState("threadId");
  const [input, setInput] = useState("");
  const [isLoading, setIsLoading] = useState(false);
  const [messages, setMessages] = useState<
    {
      role: "user" | "model";
      content: [{ text?: string; metadata?: { interrupt?: any } }];
    }[]
  >([]);

  useEffect(() => {
    if (!threadId) {
      setThreadId(self.crypto.randomUUID());
    }
  }, [threadId, setThreadId]);

  useEffect(() => {
    if (!threadId) {
      return;
    }

    setIsLoading(true);

    (async () => {
      const messagesResponse = await fetch(`/api/chat/${threadId}`, {
        method: "GET",
        credentials: "include",
      });
      if (!messagesResponse.ok) {
        setMessages([]);
      } else {
        setMessages(await messagesResponse.json());
      }
      setIsLoading(false);
    })();
  }, [threadId]);

  const [inputRef, setInputFocus] = useFocus();
  useEffect(() => {
    if (isLoading) {
      return;
    }
    setInputFocus();
  }, [isLoading, setInputFocus]);

  const submit = async ({
    message,
    interruptedToolRequest,
  }: {
    message?: string;
    interruptedToolRequest?: any;
  }) => {
    setIsLoading(true);
    const timezone = {
      region: Intl.DateTimeFormat().resolvedOptions().timeZone,
      offset: new Date().getTimezoneOffset(),
    };
    const response = await fetch(`/api/chat/${threadId}`, {
      method: "POST",
      credentials: "include",
      headers: {
        "Content-Type": "application/json",
      },
      body: JSON.stringify({ message, interruptedToolRequest, timezone }),
    });
    if (!response.ok) {
      console.error("Error sending message");
    } else {
      const { messages: messagesResponse } = await response.json();
      setMessages(messagesResponse);
    }
    setIsLoading(false);
  };

  // //When the user submits a message, add it to the list of messages and resume the conversation.
  const handleSubmit: FormEventHandler<HTMLFormElement> = async (e) => {
    e.preventDefault();
    setMessages((messages) => [
      ...messages,
      { role: "user", content: [{ text: input }] },
    ]);
    submit({ message: input });
    setInput("");
  };

  return (
    <div>
      {messages
        .filter(
          (m) =>
            ["model", "user", "tool"].includes(m.role) &&
            m.content?.length > 0 &&
            (m.content[0].text || m.content[0].metadata?.interrupt)
        )
        .map((message, index) => (
          <div key={index}>
            <Markdown>
              {(message.role === "user" ? "User: " : "AI: ") +
                (message.content[0].text || "")}
            </Markdown>
            {!isLoading &&
            message.content[0].metadata?.interrupt &&
            FederatedConnectionInterrupt.isInterrupt(
              message.content[0].metadata?.interrupt
            )
              ? (() => {
                  const interrupt: any = message.content[0].metadata?.interrupt;
                  return (
                    <div>
                      <EnsureAPIAccessPopup
                        onFinish={() => submit({ interruptedToolRequest: message.content[0] })}
                        interrupt={interrupt}
                        connectWidget={{
                          title: `Requested by: "${interrupt.toolCall.toolName}"`,
                          description: "Description...",
                          action: { label: "Check" },
                        }}
                      />
                    </div>
                  );
                })()
              : null}
          </div>
        ))}

      <form onSubmit={handleSubmit}>
        <input value={input} ref={inputRef} placeholder="Say something..." readOnly={isLoading} disabled={isLoading} onChange={(e) => setInput(e.target.value)} />
      </form>
    </div>
  );
}
1. Configure Auth0 AI
First, you must install the SDK:Report incorrect code
Copy
Ask AI
npm install @auth0/ai-llamaindex
./src/lib/auth0-ai.ts
Report incorrect code
Copy
Ask AI
import { Auth0AI } from "@auth0/ai-llamaindex";
import { auth0 } from "@/lib/auth0";

const auth0AI = new Auth0AI();

export const withGoogleCalendar = auth0AI.withTokenForConnection({
  connection: "google-oauth2",
  scopes: ["https://www.googleapis.com/auth/calendar.freebusy"],
  refreshToken: async () => {
    const session = await auth0.getSession();
    const refreshToken = session?.tokenSet.refreshToken as string;

    return refreshToken;
  },
});
Here, the property
You can check different authentication options for Next.js with Auth0 at the official documentation.
auth0 is an instance of @auth0/nextjs-auth0 to handle the application auth flows. You can check different authentication options for Next.js with Auth0 at the official documentation.
2. Integrate your tool with GitHub
Wrap your tool using the Auth0 AI SDK to obtain an access token for the GitHub API../src/lib/tools/listRepositories.ts
Report incorrect code
Copy
Ask AI
import { addHours, formatISO } from "date-fns";
import { GaxiosError } from "gaxios";
import { google } from "googleapis";
import { tool } from "llamaindex";
import { withGoogleCalendar } from "@/lib/auth0-ai";
import { getAccessTokenForConnection } from "@auth0/ai-llamaindex";
import { FederatedConnectionError } from "@auth0/ai/interrupts";
import { z } from "zod";

export const checkUsersCalendar = () =>
  withGoogleCalendar(
    tool(
      async ({ date }) => {
        // Get the access token from Auth0 AI
        const accessToken = getAccessTokenForConnection();

        // Google SDK
        try {
          const calendar = google.calendar("v3");
          const auth = new google.auth.OAuth2();

          auth.setCredentials({
            access_token: accessToken,
          });

          const response = await calendar.freebusy.query({
            auth,
            requestBody: {
              timeMin: formatISO(date),
              timeMax: addHours(date, 1).toISOString(),
              timeZone: "UTC",
              items: [{ id: "primary" }],
            },
          });

          return {
            available: response.data?.calendars?.primary?.busy?.length === 0,
          };
        } catch (error) {
          if (error instanceof GaxiosError) {
            if (error.status === 401) {
              throw new FederatedConnectionError(
                `Authorization required to access the Federated Connection`
              );
            }
          }

          throw error;
        }
      },
      {
        name: "checkUsersCalendar",
        description:
          "Check user availability on a given date time on their calendar",
        parameters: z.object({
          date: z.coerce.date(),
        }),
      }
    )
  );
3. Handle authentication redirects
Interrupts are a way for the system to pause execution and prompt the user to take an action —such as authenticating or granting API access— before resuming the interaction. This ensures that any required access is granted dynamically and securely during the chat experience. In this context, Auth0-AI SDK manages authentication redirects in the LlamaIndex SDK via these interrupts.Server Side
On the server-side code of your Next.js App, you need to set up the tool invocation and handle the interruption messaging via theerrorSerializer. The setAIContext function is used to set the async-context for the Auth0 AI SDK../src/app/api/chat/route.ts
Report incorrect code
Copy
Ask AI
import { createDataStreamResponse, LlamaIndexAdapter, Message, ToolExecutionError } from "ai";
import { listRepositories } from "@/lib/tools/";
import { setAIContext } from "@auth0/ai-llamaindex";
import { withInterruptions } from "@auth0/ai-llamaindex/interrupts";
import { errorSerializer } from "@auth0/ai-vercel/interrupts";
import { OpenAIAgent } from "llamaindex";

export async function POST(request: Request) {
  const { id, messages }: { id: string; messages: Message[] } =
    await request.json();

  setAIContext({ threadID: id });

  return createDataStreamResponse({
    execute: withInterruptions(
      async (dataStream) => {
        const agent = new OpenAIAgent({
          systemPrompt: "You are an AI assistant",
          tools: [listRepositories()],
          verbose: true,
        });

        const stream = await agent.chat({
          message: messages[messages.length - 1].content,
          stream: true,
        });

        LlamaIndexAdapter.mergeIntoDataStream(stream as any, { dataStream });
      },
      {
        messages,
        errorType: ToolExecutionError,
      }
    ),
    onError: errorSerializer((err) => {
      console.log(err);
      return "Oops, an error occured!";
    }),
  });
}
Client Side
On this example we utilize theEnsureAPIAccessPopup component to show a popup that allows the user to authenticate with GitHub and grant access with the requested scopes. You’ll first need to install the @auth0/ai-components package:Report incorrect code
Copy
Ask AI
npx @auth0/ai-components add FederatedConnections
./src/components/chat.tsx
Report incorrect code
Copy
Ask AI
"use client";

import { generateId } from "ai";
import { EnsureAPIAccessPopup } from "@/components/auth0-ai/FederatedConnections/popup";
import { useInterruptions } from "@auth0/ai-vercel/react";
import { FederatedConnectionInterrupt } from "@auth0/ai/interrupts";
import { useChat } from "@ai-sdk/react";

export default function Chat() {
  const { messages, handleSubmit, input, setInput, toolInterrupt } =
    useInterruptions((handler) =>
      useChat({
        experimental_throttle: 100,
        sendExtraMessageFields: true,
        generateId,
        onError: handler((error) => console.error("Chat error:", error)),
      })
    );

  return (
    <div>
      {messages.map((message) => (
        <div key={message.id}>
          {message.role === "user" ? "User: " : "AI: "}
          {message.content}
          {message.parts && message.parts.length > 0 && (
            <div>
              {toolInterrupt?.toolCall.id.includes(message.id) &&
                FederatedConnectionInterrupt.isInterrupt(toolInterrupt) && (
                  <EnsureAPIAccessPopup
                    interrupt={toolInterrupt}
                    connectWidget={{
                      title: `Requested by: "${toolInterrupt.toolCall.name}"`,
                      description: "Description...",
                      action: { label: "Check" },
                    }}
                  />
                )}
            </div>
          )}
        </div>
      ))}

      <form onSubmit={handleSubmit}>
        <input value={input} placeholder="Say something..." onChange={(e) => setInput(e.target.value)} autoFocus />
      </form>
    </div>
  );
}
1. Before you start
- Ensure that the Google connection in Auth0 (
google-oauth2) has the following scopes configured:openidprofileemailhttps://www.googleapis.com/auth/calendar.freebusy
2. Integrate your tool with Google Calendar
./src/lib/tools/checkUsersCalendar.ts
Report incorrect code
Copy
Ask AI
import { tool } from "ai";
import { z } from 'zod';
import { google } from "googleapis";
import { auth0 } from "@/lib/auth0";

export const checkUsersCalendar = tool({
  description: 'Check user availability on a given date time on their calendar',
  parameters: z.object({
    date: z.coerce.date(),
  }),
  execute: async ({ date }) => {
    const { token } = await auth0.getAccessTokenForConnection({ connection: 'google-oauth2' });

    // Google SDK
    const calendar = google.calendar("v3");
    const auth = new google.auth.OAuth2();

    auth.setCredentials({ access_token: token });

    const response = await calendar.freebusy.query({
      auth,
      requestBody: {
        timeMin: formatISO(date),
        timeMax: addHours(date, 1).toISOString(),
        timeZone: "UTC",
        items: [{ id: "primary" }],
      },
    });

    return {
      available: response.data?.calendars?.primary?.busy?.length === 0,
    };
  }
});
Here, the property
You can check different authentication options for Next.js with Auth0 at the official documentation.
auth0 is an instance of @auth0/nextjs-auth0 to handle the application auth flows. You can check different authentication options for Next.js with Auth0 at the official documentation.
3. Set up the API route for the chat
./src/app/api/chat/route.ts
Report incorrect code
Copy
Ask AI
import { z } from 'zod';
import { streamText } from "ai"
import { openai } from "@ai-sdk/openai"
import { google } from "googleapis";
import { checkUsersCalendar } from "@/lib/tools/checkUsersCalendar";

export const maxDuration = 60;

export async function POST(req) {
  const { messages } = await req.json()

  const response = streamText({
    model: openai('gpt-4o'),
    messages,
    system: "You're a helpful AI assistant that can read events from Google Calendar",
    tools: { checkUsersCalendar }
  })
  return response.toDataStreamResponse();
}
4. Call from the client side
./src/app/page.tsx
Report incorrect code
Copy
Ask AI
'use client';

import { useChat } from '@ai-sdk/react';

export default function Chat() {
  const { messages, input, handleInputChange, handleSubmit } = useChat();
  return (
    <div className="flex flex-col w-full max-w-3xl py-24 mx-auto stretch text-gray-100">
      {messages.map(message => (
        <div key={message.id} className="whitespace-pre-wrap">
          {message.role === 'user' ? 'User: ' : 'AI: '}
          {message.parts.map((part, i) => {
            switch (part.type) {
              case 'text':
                return <div key={`${message.id}-${i}`}>{part.text}</div>;
              case 'tool-invocation':
                return (
                  <pre key={`${message.id}-${i}`}>
                    {JSON.stringify(part.toolInvocation, null, 2)}
                  </pre>
                );
            }
          })}
        </div>
      ))}
      <form onSubmit={handleSubmit}>
        <input onChange={handleInputChange} value={input} placeholder="Say something..." className="fixed bottom-0 w-full max-w-3xl p-2 mb-8 border border-zinc-300 rounded shadow-xl text-black" />
      </form>
    </div>
  );
}
5. Example UI
Navigate tohttps://localhost:3000 to see the chat UI: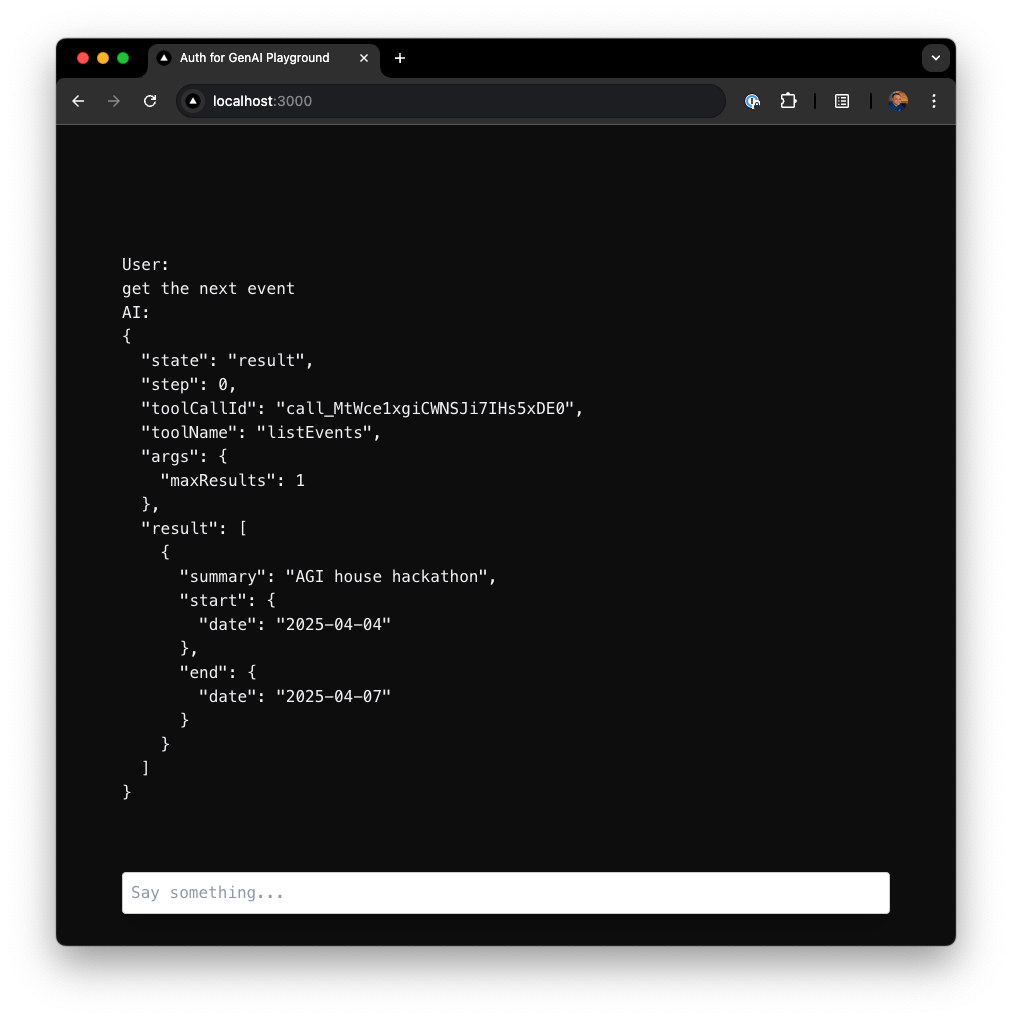 When the user sends a message like
 Get me the next event, GPT-4 interprets the request and calls the listEvents tool. This tool uses a Google access token (retrieved via Auth0) to fetch upcoming events from the user’s Google Calendar.You can extend the chat UI to display event summaries, highlight meetings, or even visualize the day’s schedule in a timeline view.Before using this example, make sure you:
- Install Python 3.11+ and
pip. - Set up an OpenAI API key.
- Configure a Social Connection for Google in Auth0
- Make sure to enable
Token Vault - Select
Offline Accessscope
- Make sure to enable
- LangGraph
- LlamaIndex
 CrewAI
1. Configure Auth0 AI
First, you must install the SDK:Report incorrect code
Copy
Ask AI
pip install auth0-ai-langchain
./src/lib/auth0-ai.py
Report incorrect code
Copy
Ask AI
from auth0_ai_langchain.auth0_ai import Auth0AI

auth0_ai = Auth0AI()

with_google = auth0_ai.with_federated_connection(
    connection="google-oauth2",
    scopes=["https://www.googleapis.com/auth/calendar.freebusy"]
    # Optional: By default, the SDK will expect the refresh token from
    # the LangChain RunnableConfig (`config.configurable._credentials.refresh_token`)
    # If you want to use a different store for refresh token you can set up a getter here
    # refresh_token=lambda *_args, **_kwargs:session["user"]["refresh_token"],
)
2. Integrate your tool with Google Calendar
Wrap your tool using the Auth0 AI SDK to obtain an access token for the Google Calendar API../src/lib/tools/check_availability.py
Report incorrect code
Copy
Ask AI
from datetime import datetime, timedelta
from googleapiclient.errors import HttpError
from googleapiclient.discovery import build
from google.oauth2.credentials import Credentials
from pydantic import BaseModel
from langchain_core.tools import StructuredTool
from auth0_ai_langchain.federated_connections import get_access_token_for_connection, FederatedConnectionError
from lib.auth0_ai import with_google

class CheckUserCalendarSchema(BaseModel):
    date: datetime

def check_user_calendar_tool_function(date: datetime):
    # Get the access token from Auth0 AI
    access_token = get_access_token_for_connection()

    # Google SDK
    try:
        service = build('calendar', 'v3', credentials=Credentials(token=access_token))
        time_min = date.isoformat() + 'Z'
        time_max = (date + timedelta(hours=1)).isoformat() + 'Z'
        body = {
            "timeMin": time_min,
            "timeMax": time_max,
            "timeZone": "UTC",
            "items": [{"id": "primary"}]
        }

        freebusy_query = service.freebusy().query(body=body).execute()
        busy_times = freebusy_query['calendars']['primary'].get('busy', [])
        return {"available": len(busy_times) == 0}
    except HttpError as e:
        if e.resp.status == 401:
            raise FederatedConnectionError("Authorization required to access the Federated Connection API")

        raise ValueError(f"Invalid response from Google Calendar API: {response.status_code} - {response.text}")

check_user_calendar_tool = with_google(StructuredTool(
    name="check_user_calendar",
    description="Use this function to check if the user is available on a certain date and time",
    args_schema=CheckUserCalendarSchema,
    func=check_user_calendar_tool_function,
))
ToolNode. The agent will automatically request the access token when the tool is called../src/lib/agent.py
Report incorrect code
Copy
Ask AI
from typing import Annotated, Sequence, TypedDict
from langchain.storage import InMemoryStore
from langchain_core.messages import AIMessage, BaseMessage
from langchain_openai import ChatOpenAI
from langgraph.checkpoint.memory import MemorySaver
from langgraph.graph import END, START, StateGraph, add_messages
from langgraph.prebuilt import ToolNode
from tools.check_availability import check_user_calendar_tool


class State(TypedDict):
    messages: Annotated[Sequence[BaseMessage], add_messages]

llm = ChatOpenAI(model="gpt-4o")
llm.bind_tools([check_user_calendar_tool])

async def call_llm(state: State):
    response = await llm.ainvoke(state["messages"])
    return {"messages": [response]}

def route_after_llm(state: State):
    messages = state["messages"]
    last_message = messages[-1] if messages else None

    if isinstance(last_message, AIMessage) and last_message.tool_calls:
        return "tools"
    return END

workflow = (
    StateGraph(State)
    .add_node("call_llm", call_llm)
    .add_node(
        "tools",
        ToolNode(
            [
                # a tool with federated connection access
                check_user_calendar_tool,
                # ... other tools
            ],
            # The error handler should be disabled to
            # allow interruptions to be triggered from within tools.
            handle_tool_errors=False
        )
    )
    .add_edge(START, "call_llm")
    .add_edge("tools", "call_llm")
    .add_conditional_edges("call_llm", route_after_llm, [END, "tools"])
)

graph = workflow.compile(checkpointer=MemorySaver(), store=InMemoryStore())
3. Handle authentication redirects
Interrupts are a way for the system to pause execution and prompt the user to take an action —such as authenticating or granting API access— before resuming the interaction. This ensures that any required access is granted dynamically and securely during the chat experience. In this context, Auth0-AI SDK manages such authentication redirects integrated with the Langchain SDK.Server Side
On the server side of your Next.js application you need to set up a route to handle the Chat API requests. This route will be responsible for forwarding the requests to the LangGraph API. Additionally, you must provide therefreshToken to the Langchain’s RunnableConfig from the authenticated user’s session../src/app/api/langgraph/[..._path]/route.ts
Report incorrect code
Copy
Ask AI
import { initApiPassthrough } from "langgraph-nextjs-api-passthrough";
import { auth0 } from "@/lib/auth0";

const getRefreshToken = async () => {
  const session = await auth0.getSession();
  const refreshToken = session?.tokenSet.refreshToken as string;
  return refreshToken;
};

export const { GET, POST, PUT, PATCH, DELETE, OPTIONS, runtime } =
  initApiPassthrough({
    apiUrl: process.env.LANGGRAPH_API_URL,
    apiKey: process.env.LANGSMITH_API_KEY,
    runtime: "edge",
    baseRoute: "langgraph/",
    bodyParameters: async (req, body) => {
      if (
        req.nextUrl.pathname.endsWith("/runs/stream") &&
        req.method === "POST"
      ) {
        return {
          ...body,
          config: {
            configurable: {
              _credentials: {
                refreshToken: await getRefreshToken(),
              },
            },
          },
        };
      }

      return body;
    },
  });
Here, the property
You can check different authentication options for Next.js with Auth0 at the official documentation.
auth0 is an instance of @auth0/nextjs-auth0 to handle the application auth flows. You can check different authentication options for Next.js with Auth0 at the official documentation.
Client Side
On this example we utilize theEnsureAPIAccessPopup component to show a popup that allows the user to authenticate with Google Calendar and grant access with the requested scopes. You’ll first need to install the @auth0/ai-components package:Report incorrect code
Copy
Ask AI
npx @auth0/ai-components add FederatedConnections
./src/components/chat.tsx
Report incorrect code
Copy
Ask AI
import { useStream } from "@langchain/langgraph-sdk/react";
import { FederatedConnectionInterrupt } from "@auth0/ai/interrupts";
import { EnsureAPIAccessPopup } from "@/components/auth0-ai/FederatedConnections/popup";

const useFocus = () => {
  const htmlElRef = useRef<HTMLInputElement>(null);
  const setFocus = () => {
    if (!htmlElRef.current) {
      return;
    }
    htmlElRef.current.focus();
  };
  return [htmlElRef, setFocus] as const;
};

export default function Chat() {
  const [threadId, setThreadId] = useQueryState("threadId");
  const [input, setInput] = useState("");
  const thread = useStream({
    apiUrl: `${process.env.NEXT_PUBLIC_URL}/api/langgraph`,
    assistantId: "agent",
    threadId,
    onThreadId: setThreadId,
    onError: (err) => {
      console.dir(err);
    },
  });

  const [inputRef, setInputFocus] = useFocus();
  useEffect(() => {
    if (thread.isLoading) {
      return;
    }
    setInputFocus();
  }, [thread.isLoading, setInputFocus]);

  const handleSubmit: FormEventHandler<HTMLFormElement> = async (e) => {
    e.preventDefault();
    thread.submit(
      { messages: [{ type: "human", content: input }] },
      {
        optimisticValues: (prev) => ({
          messages: [
            ...((prev?.messages as []) ?? []),
            { type: "human", content: input, id: "temp" },
          ],
        }),
      }
    );
    setInput("");
  };

  return (
    <div>
      {thread.messages.filter((m) => m.content && ["human", "ai"].includes(m.type)).map((message) => (
        <div key={message.id}>
          {message.type === "human" ? "User: " : "AI: "}
          {message.content as string}
        </div>
      ))}

      {thread.interrupt && FederatedConnectionInterrupt.isInterrupt(thread.interrupt.value) ? (
        <div key={thread.interrupt.ns?.join("")}>
          <EnsureAPIAccessPopup
            interrupt={thread.interrupt.value}
            onFinish={() => thread.submit(null)}
            connectWidget={{
                title: "List GitHub respositories",
                description:"description ...",
                action: { label: "Check" },
              }}
          />
        </div>
      ) : null}

      <form onSubmit={handleSubmit}>
        <input ref={inputRef} value={input} placeholder="Say something..." readOnly={thread.isLoading} disabled={thread.isLoading} onChange={(e) => setInput(e.target.value)} />
      </form>
    </div>
  );
}
1. Configure Auth0 AI
First, you must install the SDK:Report incorrect code
Copy
Ask AI
pip install auth0-ai-llamaindex
./src/lib/auth0-ai.py
Report incorrect code
Copy
Ask AI
from auth0_ai_llamaindex.auth0_ai import Auth0AI
from flask import session

auth0_ai = Auth0AI()

with_google = auth0_ai.with_federated_connection(
    connection="google-oauth2",
    scopes=["https://www.googleapis.com/auth/calendar.freebusy"],
    refresh_token=lambda *_args, **_kwargs:session["user"]["refresh_token"],
)
Here, the session is controlled by a Flask application instance. You may utilize any other framework or session store of your preference.
2. Integrate your tool with Google Calendar
Wrap your tool using the Auth0 AI SDK to obtain an access token for the Google Calendar API../src/lib/tools/check_availability.py
Report incorrect code
Copy
Ask AI
from datetime import timedelta
from googleapiclient.errors import HttpError
from googleapiclient.discovery import build
from google.oauth2.credentials import Credentials
from typing import Annotated
from llama_index.core.tools import FunctionTool
from auth0_ai_llamaindex.federated_connections import get_access_token_for_connection, FederatedConnectionError
from src.lib.auth0_ai import with_google

def check_user_calendar_tool_function(
    date: Annotated[str, "Date and time in ISO 8601 format."]
):
    # Get the access token from Auth0 AI
    access_token = get_access_token_for_connection()

    # Google SDK
    try:
        service = build('calendar', 'v3', credentials=Credentials(token=access_token))
        time_min = date.isoformat() + 'Z'
        time_max = (date + timedelta(hours=1)).isoformat() + 'Z'
        body = {
            "timeMin": time_min,
            "timeMax": time_max,
            "timeZone": "UTC",
            "items": [{"id": "primary"}]
        }

        freebusy_query = service.freebusy().query(body=body).execute()
        busy_times = freebusy_query['calendars']['primary'].get('busy', [])
        return {"available": len(busy_times) == 0}
    except HttpError as e:
        if e.resp.status == 401:
            raise FederatedConnectionError("Authorization required to access the Federated Connection API")

        raise ValueError(f"Invalid response from Google Calendar API: {response.status_code} - {response.text}")

check_user_calendar_tool = with_google(FunctionTool.from_defaults(
    name="check_user_calendar",
    description="Use this function to check if the user is available on a certain date and time",
    fn=check_user_calendar_tool_function,
))
./src/lib/agent.ts
Report incorrect code
Copy
Ask AI
from datetime import datetime
from llama_index.agent.openai import OpenAIAgent
from src.lib.tools.check_availability import check_user_calendar_tool

system_prompt = f"""You are an assistant designed to answer random user's questions.
**Additional Guidelines**:
- Today’s date for reference: {datetime.now().isoformat()}
"""

agent = OpenAIAgent.from_tools(
    tools=[
        # a tool with federated connection access
        check_user_calendar_tool
        # ... other tools
    ],
    model="gpt-4o",
    system_prompt=system_prompt
    verbose=True,
)
3. Handle authentication redirects
Interrupts are a way for the system to pause execution and prompt the user to take an action —such as authenticating or granting API access— before resuming the interaction. This ensures that any required access is granted dynamically and securely during the chat experience. In this context, Auth0-AI SDK manages such authentication redirects integrated with the LLamaIndex SDK.Server side
On the server side of your Flask application you will need to set up a route to handle the Chat API requests. This route will be responsible for forwarding the requests to the OpenAI API utilizing LlamaIndex’s SDK, that has been initialized with Auth0 AI’s protection enhancements for tools.WhenFederatedConnectionInterrupt error ocurrs, the server side will signal the front-end about the level access restrictions, and the front-end should prompt the user to trigger a new authorization (or login) request with the necessary permissions../src/app.py
Report incorrect code
Copy
Ask AI
from dotenv import load_dotenv
from flask import Flask, request, jsonify, session
from auth0_ai_llamaindex.auth0_ai import Auth0AI
from auth0_ai_llamaindex.federated_connections import FederatedConnectionInterrupt
from src.lib.agent import agent

load_dotenv()
app = Flask(__name__)

@app.route("/chat", methods=["POST"])
async def chat():
    if "user" not in session:
        return jsonify({"error": "unauthorized"}), 401

    try:
        message = request.json.get("message")
        response = agent.achat(message)
        return jsonify({"response": str(response)})
    except FederatedConnectionInterrupt as e:
        return jsonify({"error": str(e.to_json())}), 403
    except Exception as e:
        return jsonify({"error": str(e)}), 500
Coming soon!
Account Linking
If you’re integrating with Google, but users in your app or agent can sign in using other methods (e.g., a username and password or another social provider), you’ll need to link these identities into a single user account. Auth0 refers to this process as Account Linking. Account Linking logic and handling will vary depending on your app or agent. You can find an example of how to implement it in a Next.js chatbot app here. If you have questions or are looking for best practices, join our Discord and ask in the#auth0-for-gen-ai channel.